
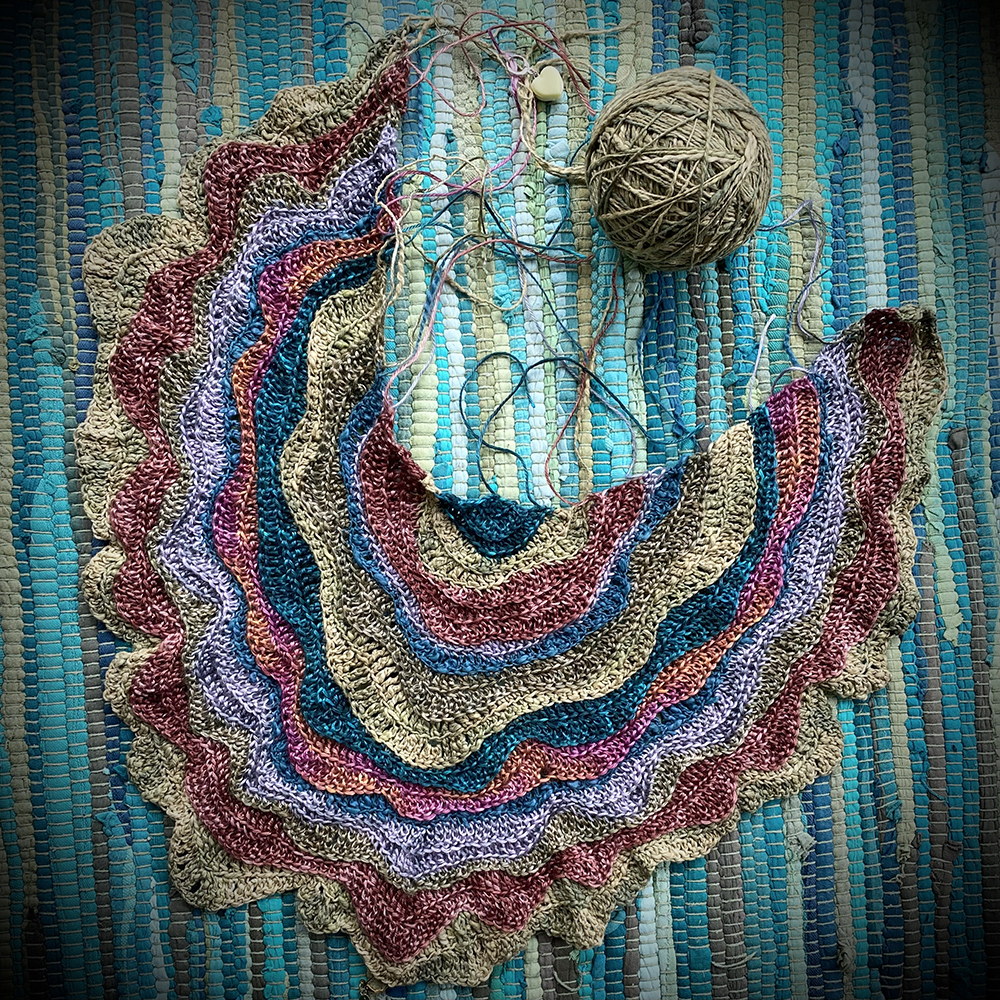
This shawl was inspired by the beauty and individuality of Turkey Tail Mushrooms. The aim is to achieve an irregular, banded, undulating effect, much like the mushrooms. It is worked in a freeform way. The idea is to feel your way, creating ripples. I will describe below the parameters within which I worked, including how I started, but ultimately, your shawl should be a reflection of you.
The instructions are written using UK crochet terms.
I have used a range of colours of 4 ply yarns and a 3.5mm hook. The yarns are tencel and thick and thin cotton – all from www.veganyarn.co.uk.
- Start and end each row with two stitches in the beginning and ending stitch of the previous row. If you feel you need 3sts instead, please feel free to do so, but it is likely your shawl with curve a lot more as a consequence.
- I have used dc, htr, tr and dtr stitches.
- Always work front loop only when working the wrong side, and back loop only when working the right side. This creates detailing on the right side, to enhance the banding and undulating effect.
- Mark the central stitch in row 2 (described below) and move the marker up with each row to keep track of your central point. Always place 3 stitches into this central stitch with each row.
- Some stitches may need more than one stitch in to keep the shawl growing outwards. If the stitch is leaning to the right (if right-handed) or left (if left-handed), add an extra stitch into the same stitch. The stitches should sit vertically aligned to the stitch below.
- If the shawl starts rippling in a vertical fashion, you may need to crochet some stitches together to start to flatten out the fabric again.
- Typically, I changed colour every 2 rows. I would work the first row in the colour, then on the second row, copy the stitches underneath. For example, if a dtr was in the row below, I would place one there in the next row.
The above are really just guidelines. The idea is to work intuitively, feeling your way with how your yarn and tension is working. And have fun!
Recipe
Magic ring
Row 1 (RS): working into the magic ring ch3, 6tr. Turn.
Row 2 (WS): working FLO, ch3 (counts as a tr), tr into the next same stitch. Tr into each of the next 2sts, 3tr into the next stitch. Mark the central tr of the 3tr with a st marker. Tr into the next 2sts, 2 tr into the top of the beginning ch3 of row 1. Turn.
Row 3 (RS): working BLO, ch3 (counts as a tr), 2tr into the same stitch. Tr into each of the next 5sts, 3tr into the next stitch (this should be your marked central st from the previous row). Mark the central tr with a st marker. Tr into the next 5sts, 3tr into the top of the beginning ch3 of row 2. Turn.
Change colour.
Row 4 (WS): working FLO, ch3 (counts as a tr), tr into the same st. Dtr, 2dtr into thr next st, tr, htr into the next 5sts, 3tr into the next st (mark central tr), dtr into the next 3 sts, dtr and tr into the next st, htr, dc into the next 3sts, 2 htr into the top of the beginning ch3 of row 3. Turn.
Row 5 (RS): working BLO, ch2 (counts as a htr), htr into the same st. dc into the next 3sts, htr, tr, dtr into thr next 5 sts, 3tr into the next st (mark central tr), htr into the next 2 sts, dc into the next 3sts, htr, tr, dtr, 2dtr into the next st, dtr into the next 2 sts, 2dtr into the beginning chs of row 4.
Change colour.

Now please continue on, using the varying height of the stitches to create irregular wavy lines.
I haven’t finished my shawl yet so I will be continuing on with this during the Autumn season. I would love to see your work if you decide to have a go.